Connect with us

App Tips

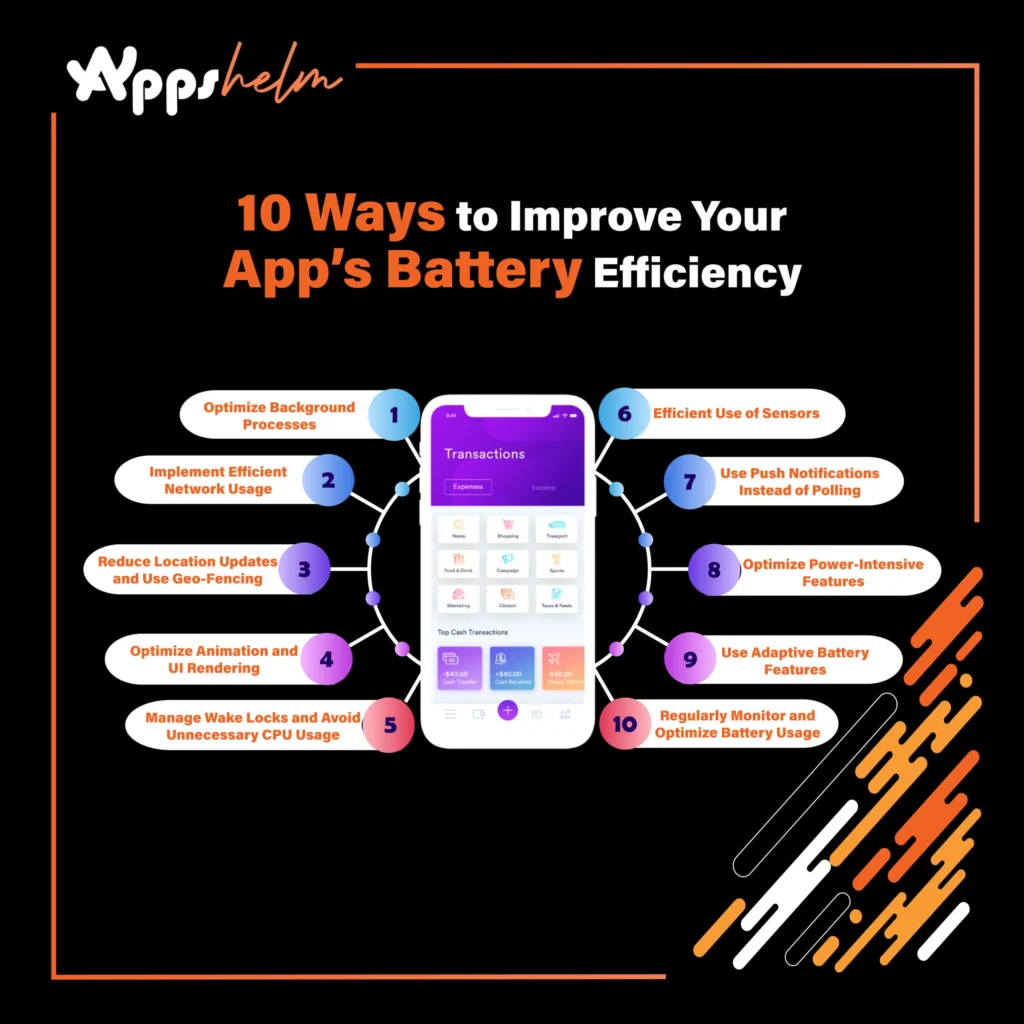
10 Ways to Improve Your App’s Battery Efficiency

Published

on

10 Ways to Improve Your App’s Battery Efficiency

Battery efficiency is a critical aspect of any mobile application. Users are quick to notice when an app drains their device’s battery, and this can significantly impact the app’s retention and ratings. With increasing competition and user expectations, optimizing battery usage is essential for app developers looking to create high-quality, user-friendly applications. In this article, we’ll explore 10 practical strategies to improve your app’s battery efficiency, ensuring a smoother experience for your users.

1. Optimize Background Processes

One of the most common reasons for excessive battery usage is background processes that continuously run even when the app is not in active use. Reducing or optimizing these background operations is key to conserving battery life. Techniques to achieve this include:

  • Using background scheduling techniques like JobScheduler (Android) or BackgroundTasks (iOS) to handle non-urgent tasks.
  • Limiting background services or transitioning to WorkManager (Android) for managing deferrable background jobs.
  • Implementing smart algorithms to decide when and if background tasks should run based on user activity.

By minimizing unnecessary background processing, you reduce battery consumption and ensure the app is only active when it needs to be.

2. Implement Efficient Network Usage

Network operations, especially data transfers, are some of the biggest culprits behind battery drain. Consider optimizing network requests to minimize battery usage:

  • Use batching to combine multiple network requests into a single one, reducing the number of times the device has to establish a connection.
  • Cache frequently accessed data locally to avoid redundant network calls.
  • Implement progressive loading so that resources like images or videos load in chunks rather than all at once.
  • Consider using HTTP/2 for more efficient data transfer.

Reducing the number of network requests and optimizing how data is transferred can significantly improve the app’s overall efficiency.

3. Reduce Location Updates and Use Geo-Fencing

Location services are notorious for consuming high levels of battery. Using continuous GPS tracking can quickly drain a device’s battery, especially if the app requires frequent updates.

To optimize battery consumption, try the following:

  • Use geo-fencing instead of continuous GPS updates to trigger location-based actions.
  • Switch to low-power location providers (such as Wi-Fi or cell tower triangulation) when high accuracy isn’t necessary.
  • Use passive location listeners to receive updates only when other apps or system services request location updates.

Implementing these practices will minimize the power drain associated with location tracking while maintaining essential functionality.

4. Manage Wake Locks and Avoid Unnecessary CPU Usage

A wake lock is a mechanism that prevents the device’s CPU from entering a sleep state. While wake locks are sometimes necessary, misusing them can lead to excessive battery drain.

  • Use partial wake locks only when absolutely required and ensure they are released promptly.
  • Avoid wake locks for tasks that don’t require constant CPU attention.
  • Use JobScheduler and AlarmManager to schedule tasks that can run when the CPU is already awake.

Properly managing wake locks will help ensure that your app doesn’t unnecessarily keep the CPU running, which conserves battery life.

5. Optimize Animation and UI Rendering

Smooth animations and visually appealing UI elements are great for user experience, but they can also be a drain on the battery if not implemented correctly. Techniques for optimizing UI rendering include:

  • Limiting the use of complex animations and keeping frame rates balanced.
  • Avoiding heavy graphics processing, such as continuous rendering of 3D objects or complex image manipulations.
  • Using hardware acceleration where possible to offload rendering to the GPU.

Optimizing the app’s UI and animations ensures that the device doesn’t expend more energy than necessary to display the user interface.

6. Efficient Use of Sensors

Modern smartphones come with various sensors, such as accelerometers, gyroscopes, and proximity sensors, which can enhance app functionality. However, these sensors can also quickly consume battery power if used incorrectly.

  • Avoid keeping sensors active for long periods.
  • Use sensor batching to reduce the number of times sensor data is sent to the app.
  • Implement event-based triggers instead of continuous monitoring.

Managing sensor activity carefully can prevent unnecessary energy drain, particularly in apps that rely heavily on motion or environmental data.

7. Use Push Notifications Instead of Polling

Polling is the process of repeatedly checking a server for new information, which is highly inefficient. Replacing polling with push notifications can dramatically reduce the frequency of network activity and conserve battery life.

  • Implement silent push notifications to trigger data updates only when necessary.
  • Use Firebase Cloud Messaging (FCM) for Android or Apple Push Notification Service (APNs) for iOS for delivering lightweight notifications.
  • Avoid frequent polling by setting appropriate update intervals.

Push notifications ensure that the app only wakes up when there’s new information to display, saving significant amounts of battery power.

8. Optimize Power-Intensive Features

Power-intensive features like video playback, voice recognition, or image processing can quickly drain battery life. Optimize these features by:

  • Implementing power-saving modes for heavy features (e.g., lowering frame rates during video playback).
  • Compressing images and videos to reduce processing time.
  • Offloading complex processing tasks to the server, where applicable.

Balancing feature performance with power consumption will prevent these capabilities from being a drain on the user’s battery.

9. Use Adaptive Battery Features

Both Android and iOS have introduced adaptive battery features designed to identify and limit power-hungry apps. Developers should leverage these system-level optimizations:

  • For Android, use the App Standby Buckets API to inform the system of the app’s battery priorities.
  • Implement iOS’s Background Fetch and Background Refresh mechanisms to reduce battery impact.
  • Use Doze Mode and App Standby to manage how often your app runs in the background.

Integrating these features ensures that the operating system can intelligently manage the app’s battery usage.

10. Regularly Monitor and Optimize Battery Usage

Finally, regularly analyzing your app’s battery consumption is crucial for identifying areas that need improvement. Use built-in tools like:

  • Android Studio Profiler and Xcode’s Energy Log to measure battery usage and optimize accordingly.
  • Employ analytics and crash-reporting tools to identify performance issues and excessive battery drain.
  • Gather user feedback to understand real-world performance and make adjustments.

Regular monitoring and optimization will help ensure that your app remains battery-efficient as new updates and features are introduced.

Conclusion

Improving your app’s battery efficiency requires a multi-faceted approach, from managing background processes to optimizing UI animations and leveraging system-level features. By implementing these 10 strategies, you can create an app that not only delivers excellent performance but also conserves energy, providing a better experience for your users and boosting your app’s overall reputation. With a focus on battery efficiency, your app can stand out in a competitive market where performance and user satisfaction are paramount.

Continue Reading
Click to comment

Leave a Reply

Your email address will not be published. Required fields are marked *

App Tips

Top Fitness Apps to Help You Stay on Track with Your Health Goals

Published

on

By

Top Fitness Apps to Help You Stay on Track with Your Health Goals

Top Fitness Apps to Help You Stay on Track with Your Health Goals

Maintaining a consistent fitness routine can be a challenge, especially with today’s busy lifestyles. However, fitness apps have emerged as essential tools for anyone looking to achieve their health and fitness goals. From tracking workouts and meals to offering personalized coaching and motivation, these apps make it easier than ever to stay on track. Whether you’re looking to lose weight, build muscle, or simply stay active, there’s a fitness app that fits your needs. In this article, we’ll explore the top fitness apps available today and how they can help you achieve your health goals.

1. MyFitnessPal: Best for Tracking Nutrition and Exercise

MyFitnessPal is one of the most popular and comprehensive fitness apps on the market, known for its robust calorie and nutrition tracking features. Whether you want to lose weight, maintain your current weight, or gain muscle, this app can help you stay on track by tracking both your food intake and exercise.

The app boasts a massive database of over 11 million foods, making it easy to log meals by scanning barcodes or manually entering ingredients. It also allows you to track macronutrients like carbohydrates, proteins, and fats, which is particularly helpful if you’re following a specific diet plan. Beyond nutrition, MyFitnessPal integrates with various fitness trackers and devices to monitor your activity levels, making it a comprehensive tool for managing both diet and exercise.

Key Features:

  • Extensive food and exercise database
  • Barcode scanning for quick meal logging
  • Integration with other fitness apps and devices
  • Detailed nutritional insights and goal tracking

2. Nike Training Club: Best for At-Home Workouts

Nike Training Club is a versatile fitness app that offers free, on-demand workouts ranging from beginner to advanced levels. Whether you’re interested in strength training, cardio, yoga, or mobility exercises, Nike Training Club has a wide variety of workout plans designed by professional trainers.

The app includes workouts for different fitness goals, such as improving endurance, toning muscles, or losing weight. Each session comes with step-by-step guidance, video demonstrations, and progress tracking. One of the standout features is its personalized workout recommendations based on your activity and goals. Nike Training Club also offers targeted programs that last four to six weeks, ideal for users who want a structured fitness plan.

Key Features:

  • Wide range of workouts (strength, cardio, yoga, etc.)
  • Guided routines from professional trainers
  • Personalization based on user goals
  • Customizable workout plans

3. Fitbit: Best for Tracking Daily Activity

For those who already own a Fitbit device, the Fitbit app is a powerful companion that tracks daily activities like steps, heart rate, sleep, and workouts. The app is designed to help users reach their fitness goals by offering real-time data on daily activity levels and long-term trends. It can track everything from the number of steps taken each day to calories burned and even the quality of your sleep.

One of Fitbit’s biggest advantages is its ability to monitor your overall well-being. It tracks not only your fitness levels but also your sleep patterns and heart rate variability, providing insights into how well your body is recovering and functioning. The app’s community features also allow users to join challenges and compete with friends, adding an element of motivation and accountability.

Key Features:

  • Detailed tracking of steps, heart rate, and sleep
  • Integration with Fitbit wearable devices
  • Community challenges and leaderboards
  • Personalized insights based on activity levels

4. Strava: Best for Runners and Cyclists

Strava is a go-to fitness app for runners, cyclists, and outdoor enthusiasts. It tracks routes, distance, pace, and elevation using GPS and offers detailed performance analytics after each workout. Strava is popular among athletes who want to track their progress over time, set personal records, and compare their performance with other athletes in their area.

One of the unique features of Strava is its social component. Users can join clubs, share their workouts, and compete on leaderboards, which can be highly motivating. Whether you’re training for a marathon or just enjoying a casual bike ride, Strava’s robust data tracking and analytics make it an excellent tool for both serious athletes and recreational fitness enthusiasts.

Key Features:

  • GPS tracking for running, cycling, and hiking
  • Detailed analytics on pace, distance, and elevation
  • Social features, including clubs and leaderboards
  • Integration with wearables and fitness devices

5. Calm: Best for Mental Fitness and Mindfulness

While physical fitness is important, mental well-being plays an equally vital role in achieving overall health goals. Calm is a mindfulness and meditation app designed to help users reduce stress, improve sleep, and cultivate mental resilience. With guided meditations, breathing exercises, and sleep stories, Calm offers tools that complement your physical fitness efforts by focusing on mental fitness.

The app also offers mindfulness programs tailored to specific goals, such as improving focus, reducing anxiety, or enhancing overall happiness. For those struggling with sleep, Calm’s sleep stories and music can help you unwind and get better rest, which is essential for recovery and performance in physical fitness.

Key Features:

  • Guided meditations and mindfulness exercises
  • Sleep stories and relaxation music
  • Breathing exercises to reduce stress
  • Customizable mindfulness programs

6. JEFIT: Best for Strength Training

JEFIT is a fitness app tailored for those focused on strength training and bodybuilding. It offers thousands of workout routines for all fitness levels, along with detailed instructions and tracking features for every exercise. JEFIT also allows you to log your workouts, track your progress, and measure improvements in strength over time.

The app includes a workout planner that helps you create a customized workout routine based on your goals, whether you’re looking to build muscle, lose fat, or improve endurance. With JEFIT, you can easily track weights, reps, and sets, making it a great tool for anyone serious about resistance training.

Key Features:

  • Workout tracking for strength training and bodybuilding
  • Pre-made workout routines and customizable plans
  • Progress tracking for strength and muscle growth
  • Detailed exercise instructions and demonstrations

Conclusion: Achieving Your Fitness Goals with the Right App

In today’s digital age, fitness apps have become invaluable tools for anyone looking to stay on track with their health and wellness goals. Whether you’re interested in improving your nutrition, staying active at home, or tracking your daily movements, there’s an app that can meet your specific needs.

Apps like MyFitnessPal and Fitbit offer comprehensive tracking, while Nike Training Club and JEFIT provide structured workout plans to guide your fitness journey. Meanwhile, apps like Calm ensure that you’re focusing on mental fitness alongside physical health. No matter your fitness level or goals, these top fitness apps can help you stay motivated, organized, and on track toward a healthier lifestyle.

Continue Reading

App Tips

How to Optimize Your App Store Listing for Higher Visibility and Downloads

Published

on

By

How to Optimize Your App Store Listing for Higher Visibility and Downloads

Creating a high-quality app is only half the battle in the competitive world of mobile applications. To ensure your app reaches its full potential, optimizing your app store listing is essential for higher visibility and downloads. App Store Optimization (ASO) is a systematic approach to improving your app’s ranking and visibility within an app store like Google Play or Apple’s App Store. In this article, we’ll explore key strategies and best practices to effectively optimize your app store listing and attract more users.

1. Choose the Right App Name and Title

Your app’s name is the first impression users get, and it plays a crucial role in ASO. The name should be unique, memorable, and reflect the app’s primary function or purpose. Here are a few tips for creating an effective app name:

  • Use Relevant Keywords: Include high-ranking keywords in the title, as both Google Play and Apple’s App Store consider the app title in their search algorithms. For example, if you have a fitness app, include words like “fitness,” “workout,” or “training.”
  • Keep It Short and Simple: While using keywords is important, don’t stuff them. Ensure the name is concise and doesn’t exceed character limits (30 characters for Apple’s App Store and up to 50 for Google Play).
  • Avoid Unnecessary Symbols: Stick to alphabets and numerals. Special symbols can look spammy and reduce readability.

Example: Instead of a vague name like Pro Health, use Pro Health: Fitness & Workout App to make it keyword-rich and descriptive.

2. Optimize Your App’s Description

The description should provide a clear, compelling overview of your app and its features. This section is particularly important on Google Play, as its search algorithm considers keywords within the description. For Apple’s App Store, it’s less impactful for rankings but crucial for convincing users.

Key Tips:

  • First Few Lines Matter: Focus on the first 252 characters, as this is what users see without expanding the description. Include key features, benefits, and a call to action.
  • Bullet Points for Clarity: Use bullet points to highlight main features and make the text scannable.
  • Include Keywords Naturally: Mention high-ranking keywords, but maintain a natural flow to avoid keyword stuffing.
  • Update Regularly: Keep your description up-to-date with new features, user testimonials, and achievements to show continuous improvement.

Example of an effective opening:
“Achieve your fitness goals with Pro Health! Track workouts, monitor your progress, and follow personalized training plans. Download now and start your journey towards a healthier lifestyle!”

3. Leverage High-Quality App Icons

The app icon is a visual representation of your app and plays a significant role in driving clicks and downloads. A well-designed icon can make your app stand out in search results and entice users to explore further.

Best Practices:

  • Keep It Simple and Relevant: Avoid clutter. Your icon should be a simple, recognizable symbol of your app’s purpose.
  • Use Bold Colors: Bright, bold colors grab attention but ensure they don’t overwhelm. Maintain contrast between the background and the symbol.
  • Stay Consistent with Your Brand: Use colors, shapes, and styles that align with your app’s branding to create a cohesive look.

For example, a minimalist design works well for utility apps, while games may benefit from vibrant and dynamic icons.

4. Choose the Right Screenshots and Videos

Visual elements like screenshots and videos are vital for showcasing your app’s features. They help users understand the app’s interface, usability, and unique selling points. Use this space strategically to convince potential users to download.

Tips for Effective Screenshots:

  • Highlight Core Features: The first two screenshots should showcase the app’s most attractive and useful features.
  • Use Captions: Add short, descriptive text overlays to highlight key functionalities or user benefits.
  • Show the App in Action: Use real, in-app images that demonstrate the app’s user experience and interface.

Videos:

  • Keep it Short: A 15-30 second video is enough to convey your app’s value.
  • Focus on Visuals: Don’t rely heavily on text. Make sure the visuals clearly communicate the app’s primary features.

5. Use the Right Keywords

Keyword optimization is a cornerstone of ASO. Using the right keywords improves your app’s searchability and ranking.

Keyword Research Tips:

  • Analyze Competitors: Use tools like Sensor Tower, App Annie, or Keyword Tool to analyze what keywords top competitors are using.
  • Use Long-Tail Keywords: Long-tail keywords (e.g., “best home workout app”) are less competitive and can drive more targeted traffic.
  • Monitor and Adjust Regularly: ASO is an ongoing process. Keep track of keyword rankings and update them based on performance.

6. Gather Positive Ratings and Reviews

Ratings and reviews are a crucial factor in both app stores’ ranking algorithms. Apps with higher ratings and positive reviews rank better and appear more credible to users.

Strategies for Gathering Reviews:

  • Prompt Users at the Right Time: Ask for a review after a positive experience, like completing a level in a game or using a feature successfully.
  • Respond to Reviews: Address negative reviews professionally and thank users for positive feedback.
  • Incentivize Feedback: Offer small in-app rewards or exclusive content to users who leave a review.

7. Localize Your App Store Listing

Localization involves adapting your app store listing to cater to different languages and regions. It can significantly boost visibility and downloads in non-English-speaking markets.

How to Localize:

  • Translate the App Title and Description: Ensure translations are accurate and contextually relevant.
  • Adapt Visuals and Screenshots: Modify screenshots to reflect local culture and language where necessary.
  • Use Local Keywords: Research and implement local keywords to target specific regions effectively.

8. Optimize for App Store Algorithm Updates

Both Google Play and Apple’s App Store frequently update their ranking algorithms. Stay informed about changes and adjust your ASO strategy accordingly.

  • Keep Track of Industry Updates: Follow ASO communities and forums like ASO Stack and Google Developer Blog.
  • A/B Test Regularly: Experiment with different titles, descriptions, and visuals to determine what works best.

Conclusion

Optimizing your app store listing is an ongoing process that requires a combination of keyword research, visual appeal, and user engagement strategies. By implementing these best practices, you can improve your app’s visibility, attract more potential users, and ultimately increase downloads. Remember, success in the app stores is about creating a great first impression and delivering a compelling reason for users to choose your app over the competition.

Continue Reading

App Tips

Cross-Platform vs. Native Apps: Which is Right for Your Business?

Published

on

By

Native apps vs cross platform

Cross-Platform vs. Native Apps: Which is Right for Your Business?

In the fast-paced digital era, mobile apps have become an integral part of business strategies. They not only enhance customer engagement but also serve as a vital tool for improving operational efficiency. However, when it comes to developing a mobile app, one of the first decisions businesses face is whether to opt for a cross-platform or native app. Both approaches have their advantages and drawbacks, and the choice between them can significantly impact the app’s performance, user experience, and development cost. This article will explore the key differences between cross-platform and native apps to help you decide which option is best for your business.

Understanding Native Apps

Native apps are developed specifically for a single platform, such as iOS or Android, using platform-specific programming languages—Swift or Objective-C for iOS and Kotlin or Java for Android. Because they are built for a particular operating system, native apps can fully leverage the device’s hardware and software capabilities, resulting in high performance and a seamless user experience.

Advantages of Native Apps:

  1. Performance: Native apps are known for their superior performance. Since they are developed and optimized for a specific platform, they can directly interact with the device’s resources and run smoothly without any lag.
  2. User Experience: Native apps provide an exceptional user experience by adhering to platform-specific design guidelines. This consistency in design and interaction patterns leads to a more intuitive and engaging user experience.
  3. Access to Device Features: Native apps can easily access and utilize the device’s features, such as the camera, GPS, microphone, and push notifications. This capability allows developers to create feature-rich applications that can take full advantage of the hardware.
  4. Security: Native apps tend to be more secure since they can leverage built-in security features provided by the platform, such as encryption and biometric authentication.

Drawbacks of Native Apps:

  1. Higher Development Costs: Developing a native app requires separate codebases for each platform (iOS and Android), which can significantly increase the development time and cost.
  2. Maintenance: Maintaining and updating two separate codebases can be challenging and time-consuming, leading to higher ongoing maintenance costs.

Understanding Cross-Platform Apps

Cross-platform apps are developed using a single codebase that can be deployed across multiple platforms, such as iOS and Android. Frameworks like React Native, Flutter, and Xamarin have made cross-platform app development more popular by allowing developers to write code once and run it on multiple platforms.

Advantages of Cross-Platform Apps:

  1. Cost-Efficiency: Since cross-platform apps use a single codebase for multiple platforms, the development costs are generally lower compared to native apps. This approach also reduces the time to market, making it an attractive option for businesses with limited budgets.
  2. Faster Development: With a shared codebase, developers can build and deploy apps faster. Updates and bug fixes can also be applied simultaneously across all platforms, streamlining the development process.
  3. Wider Reach: Cross-platform apps can be deployed on both iOS and Android devices, allowing businesses to reach a broader audience without developing separate apps for each platform.

Drawbacks of Cross-Platform Apps:

  1. Performance Limitations: Cross-platform apps may not perform as well as native apps because they rely on a bridge to communicate with the device’s hardware. This can result in slower performance and a less responsive user interface, particularly for complex apps.
  2. Limited Access to Device Features: Cross-platform frameworks may not provide full access to all native device features, limiting the app’s functionality. While most frameworks offer plugins or extensions to access specific features, they may not be as efficient as native implementations.
  3. Design Limitations: Achieving a native look and feel can be challenging with cross-platform apps. While frameworks like Flutter and React Native offer tools to mimic native design elements, they may not fully replicate the platform-specific user experience.

Choosing the Right Approach for Your Business

The choice between cross-platform and native app development depends on several factors, including your business goals, target audience, budget, and the complexity of the app.

When to Choose Native Apps:

  • Performance-Critical Applications: If your app requires high performance, such as gaming apps or apps with complex animations, a native approach is ideal.
  • Superior User Experience: If delivering an outstanding user experience is a top priority, native apps are the way to go. They offer better integration with platform-specific design elements and provide a more polished and responsive interface.
  • Access to Device Features: If your app needs to utilize advanced device features like AR, VR, or advanced camera functions, native development offers better access and performance.

When to Choose Cross-Platform Apps:

  • Limited Budget and Resources: If you need to launch your app on multiple platforms but have a limited budget and resources, cross-platform development is a cost-effective solution.
  • Faster Time to Market: If speed is a priority and you need to deploy your app quickly across different platforms, cross-platform frameworks can significantly reduce development time.
  • Broad Audience Reach: If you want to reach users on both iOS and Android without developing separate apps, cross-platform development allows you to do so with a single codebase.

Conclusion

Choosing between cross-platform and native app development is a critical decision that can impact your app’s success. Native apps offer superior performance, user experience, and access to device features, making them ideal for performance-critical applications. However, they come with higher development costs and longer timelines. Cross-platform apps, on the other hand, provide a cost-effective and time-efficient way to reach a broader audience, albeit with some limitations in performance and access to native features.

Carefully assess your business requirements, budget, and target audience before making a decision. Whether you opt for native or cross-platform development, the key is to choose an approach that aligns with your business goals and delivers the best possible experience to your users.

Continue Reading

Trending

Copyright © 2024 AppsHelm. Managed By Sanan